Fixing acoustic panels to your wall is a relatively straightforward process that can significantly improve your room’s acoustics. This guide will walk you through the steps and provide essential tips.
Whether you’re dealing with adhesive, brackets, or other methods, we’ll cover the basics to ensure a successful installation.
Let’s get started!
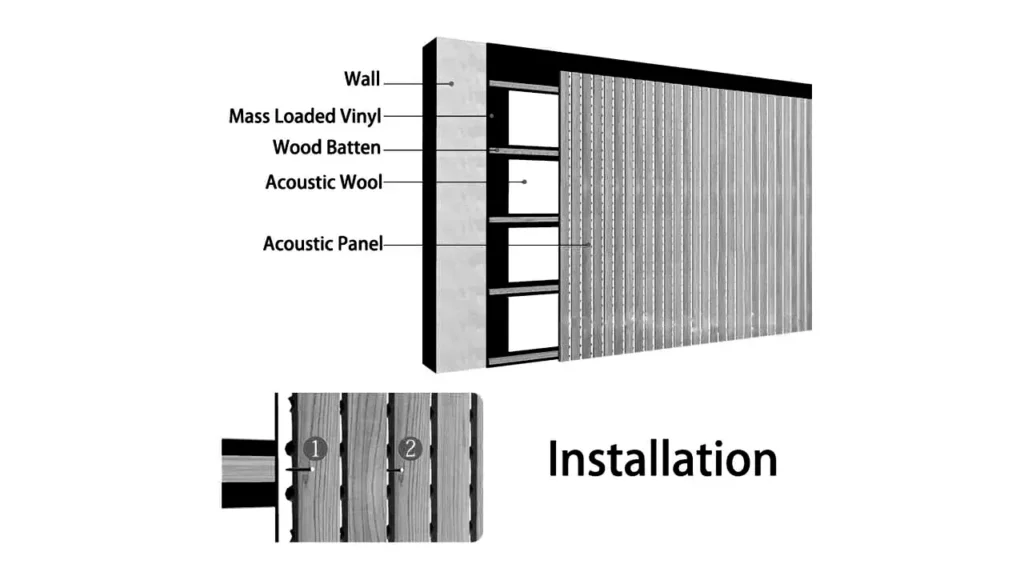
Acoustic Panel Fixing Detail
Adhesive Application
- Even distribution: When using adhesive spray, ensure a consistent and even coat on the back of the panel for optimal adhesion.
- Corner coverage: Pay special attention to the corners of the panel, applying a generous amount of adhesive for a secure hold.
- Avoid excess: While it’s essential to cover the entire surface, avoid excessive adhesive as it can cause a mess and might not improve the bond.
Panel Placement
- Level and align: Use a level to ensure the panel is straight before pressing it against the wall.
- Firm pressure: Apply consistent and firm pressure to the entire panel to establish a strong bond with the adhesive.
- Avoid sliding: Once the panel is in position, try to avoid moving it to prevent the adhesive from losing its grip.
Additional Considerations
- Wall type: Different wall surfaces (drywall, concrete, brick) might require different adhesives or preparation methods.
- Panel weight: For heavier panels, consider using a stronger adhesive or additional support methods.
- Temperature and humidity: Extreme temperature and humidity conditions can affect the adhesive’s performance.
- Ventilation: Ensure proper ventilation when using adhesive sprays to avoid inhaling fumes.
Alternative Fixing Methods
- Double-sided tape: For lightweight panels, double-sided tape can be a viable option. However, it might not be as strong as adhesive spray for larger panels.
- Mounting brackets: For heavier panels or permanent installations, mounting brackets offer a secure and durable solution.
By following these detailed steps and considering the specific conditions of your installation, you can achieve a secure and long-lasting bond between your acoustic panels and the wall.
Would you like more information on specific adhesive types or panel weights?
How to Fix Acoustic Panels to Wall?
Fixing acoustic panels to your wall is a relatively straightforward process that can significantly improve your room’s acoustics. There are several methods you can use, depending on the type of panel and your wall surface.
Method 1: Adhesive
Best for: Lightweight panels and temporary installations.
Process:
- Clean the wall thoroughly to ensure good adhesion.
- Apply a strong adhesive to the back of the panel.
- Carefully position the panel on the wall and press firmly.
- Allow the adhesive to cure completely before applying pressure to the panel.
Method 2: Mounting Brackets
Best for: Heavier panels and permanent installations.
Process:
- Mark the wall for bracket placement.
- Drill pilot holes and insert wall anchors.
- Secure the brackets to the wall using acoustic panel screws.
- Attach the panels to the brackets using appropriate fasteners.
Method 3: Suspension System (for larger panels)
Best for: Large, heavy panels or when you want to create a suspended look.
Process:
- Use wire, chain, or rope to suspend the panels from the ceiling or wall.
- Secure the suspension system to the panel and the ceiling or wall.
Important Considerations:
- Panel weight: The weight of the panel will determine the appropriate attachment method.
- Wall type: Consider the type of wall material (drywall, concrete, etc.) when choosing a method.
- Panel material: Some panels come with pre-attached mounting options.
- Aesthetics: The desired look of your room may influence your choice of installation method.
By following these guidelines and considering your specific needs, you can effectively fix acoustic panels to your wall and improve your room’s acoustics.
How to Install Acoustic Panels on a Wall
Installing acoustic panels is a great way to improve sound quality in a room. Here’s a general guide on how to install them:
Materials Needed:
- Acoustic panels
- Stud finder
- Drill
- Screws
- Level
- Pencil
- Measuring tape
- Construction adhesive (optional)
Steps about acoustic panel installation:
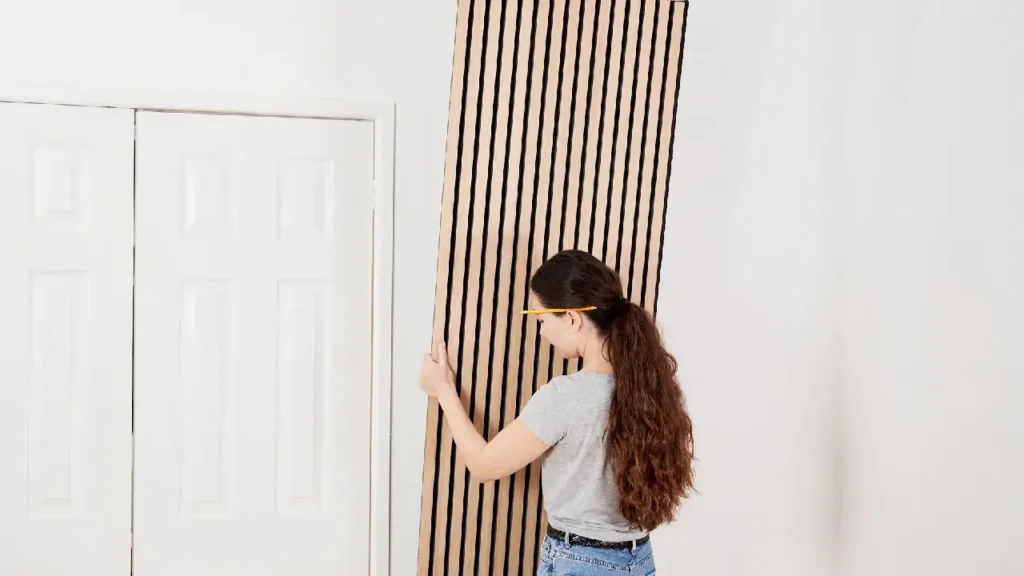
Plan the Layout:
- Identify Problem Areas: Determine the areas of the room that need the most sound absorption. This might be near reflective surfaces like large windows or hard walls.
- Visualize the Layout: Sketch a layout of the wall, marking where you’ll place the panels. Consider factors like aesthetics and the desired level of sound absorption.
Prepare the Wall:
- Clean the Surface: Ensure the wall is clean and free of dust or debris.
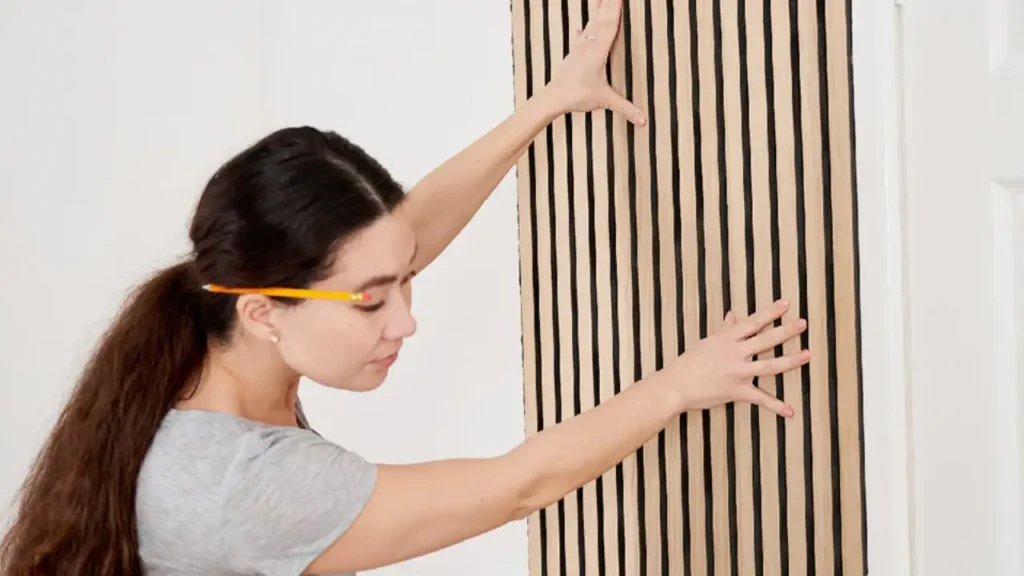
- Mark the Mounting Points: Use a stud finder to locate the wall studs. Mark these locations with a pencil.
Choose Installation Method:
- Direct Mounting with Screws:
- Drill pilot holes into the wall studs at the marked locations.
- Attach the acoustic panels directly to the wall using screws. Ensure the panels are level and secure.
- Adhesive Mounting:
- Apply construction adhesive to the back of the panel.
- Position the panel on the wall and press firmly to adhere it to the surface.
- For added security, consider using additional screws to secure the panel to the wall studs.
Additional Tips:
- Corner Installation: For corner installations, you may need to cut the panels to fit. Use a jigsaw or utility knife to cut the panels to the desired size.
- Edge Treatment: If you want a cleaner finish, consider using edge trim or painting the edges of the panels to match the wall color.
- Wiring and Outlets: Be mindful of electrical outlets and switches when planning your panel layout. You may need to cut panels to fit around these obstructions or relocate them.
Remember:
- Safety First: Wear protective gear like gloves and safety glasses when drilling and cutting.
- Consult Professional Advice: If you’re unsure about any step or have a complex installation, consult with a professional.
- Consider Professional Installation: For larger projects or intricate designs, hiring a professional installer may be the best option.
By following these steps and considering your specific room’s needs, you can effectively install acoustic panels to improve sound quality and create a more comfortable environment.
Conclusion
Successfully fixing acoustic panels to your wall is a relatively simple process that can dramatically improve your room’s acoustics. By carefully selecting the appropriate method and following the steps outlined above, you can achieve a secure and long-lasting installation.
Remember, proper preparation and the choice of materials are crucial for optimal results. If you’re unsure about the best approach or prefer a professional installation, don’t hesitate to seek assistance.
Ready to transform your space with premium acoustic panels? Contact us today for a free quote and expert advice. Our team can help you choose the right panels and ensure a flawless installation.