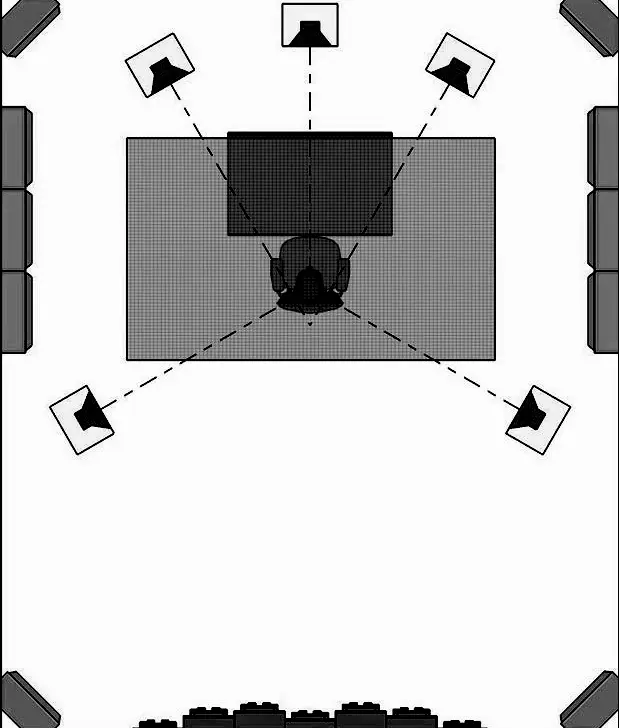
Are you tired of unwanted echoes and reverberations in your room? Do you wish you could create a more immersive and enjoyable listening experience? The solution might lie in the acoustic panel layout. By strategically positioning acoustic panels throughout your space, you can significantly improve sound quality, reduce noise, and enhance overall comfort.
In this blog post, we’ll delve into the art of acoustic panel layout. We’ll discuss key factors to consider, provide practical tips, and offer visual examples to help you optimize your room’s acoustics.
Whether you’re a music enthusiast, a home theater aficionado, or simply looking to create a quieter and more peaceful environment, this guide will equip you with the knowledge you need.
Acoustic Panel Layout Ideas
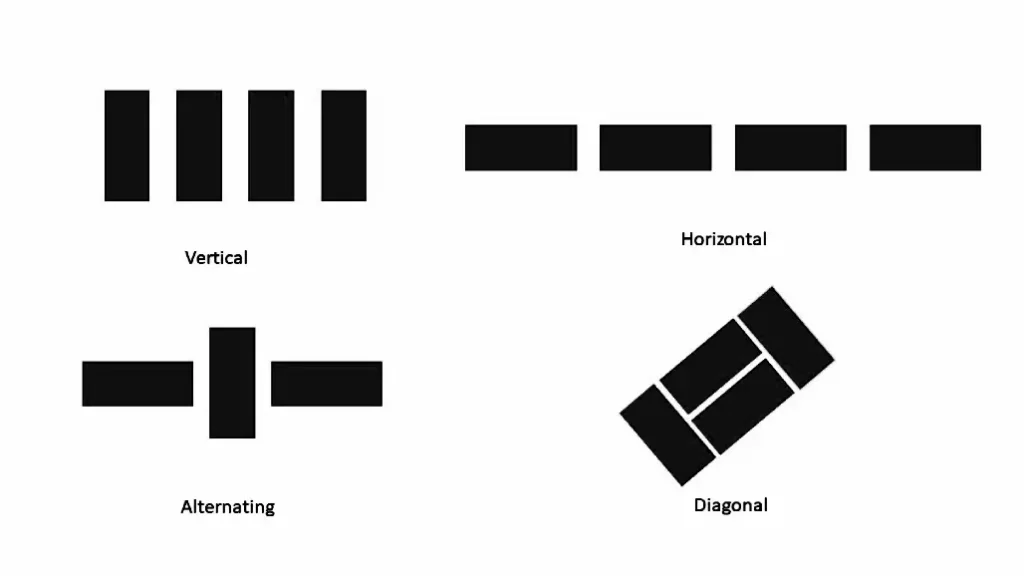
1. Vertical Acoustic Panel Layout
Vertical acoustic panels are typically arranged in a grid pattern, with a spacing between panels that depends on the desired level of sound absorption.
They are often used in recording studios, home theaters, and other spaces where sound quality is important. The panels can be made of various materials, such as foam, mineral wool, or recycled materials.
2. Horizontal Acoustic Panel Layout
Horizontal Acoustic Panel Layout is a common arrangement where panels are placed horizontally on walls to absorb sound waves. This layout is effective in reducing echoes and improving sound quality in spaces like studios, home theaters, and conference rooms.
The horizontal orientation helps to capture sound waves that travel horizontally, reducing reverberation and creating a more balanced acoustic environment.
3. Alternating Acoustic Panel Layout
Alternating Acoustic Panel Layout is a design strategy where acoustic panels are arranged in an alternating pattern, such as horizontal and vertical rows. This layout helps to diffuse sound waves more evenly, preventing them from reflecting back in a concentrated manner.
By breaking up the sound waves and dispersing them throughout the room, alternating panels can improve sound clarity and reduce echoes, making listening experiences more enjoyable in spaces like concert halls, auditoriums, and music studios.
4. Diagonal Acoustic Panel Layout
Diagonal Acoustic Panel Layout is an arrangement where panels are placed diagonally on walls. This layout is often used to control sound reflections from specific angles and to create unique acoustic patterns.
It can be particularly effective in spaces with irregular shapes or where sound reflections are causing problems from specific directions. Diagonal placement can help to disperse sound energy more evenly and reduce echoes, improving overall sound quality.
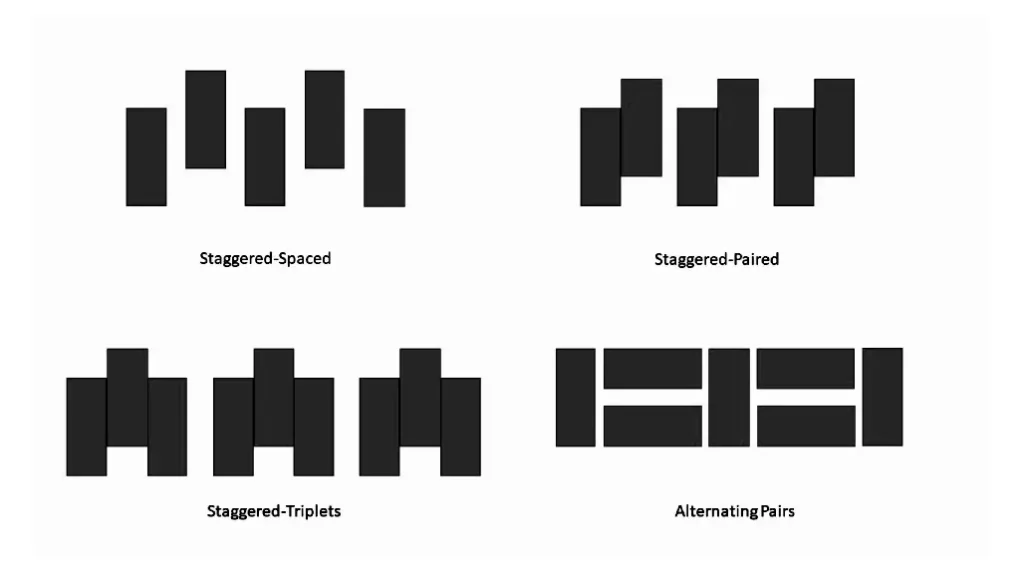
5. Staggered-spaced Acoustic Panel Layout
In this arrangement, panels are spaced unevenly on the wall. This can help to diffuse sound waves and prevent standing waves from forming. It’s often used in spaces with complex acoustics or where specific sound reflection patterns need to be controlled.
6. Staggered-paired Acoustic Panel Layout
This layout involves placing pairs of panels at varying distances apart. This can create a more complex acoustic pattern and help to reduce echoes from multiple directions.
7. Staggered-triplets Acoustic Panel Layout
Similar to staggered pairs, but with triplets of panels placed at different distances. This provides even more control over sound diffusion and reflection.
8. Alternating Pairs Acoustic Panel Layout
Panels are placed in pairs, alternating between different distances or orientations. This can create a unique acoustic pattern and help to control sound reflections in specific areas.
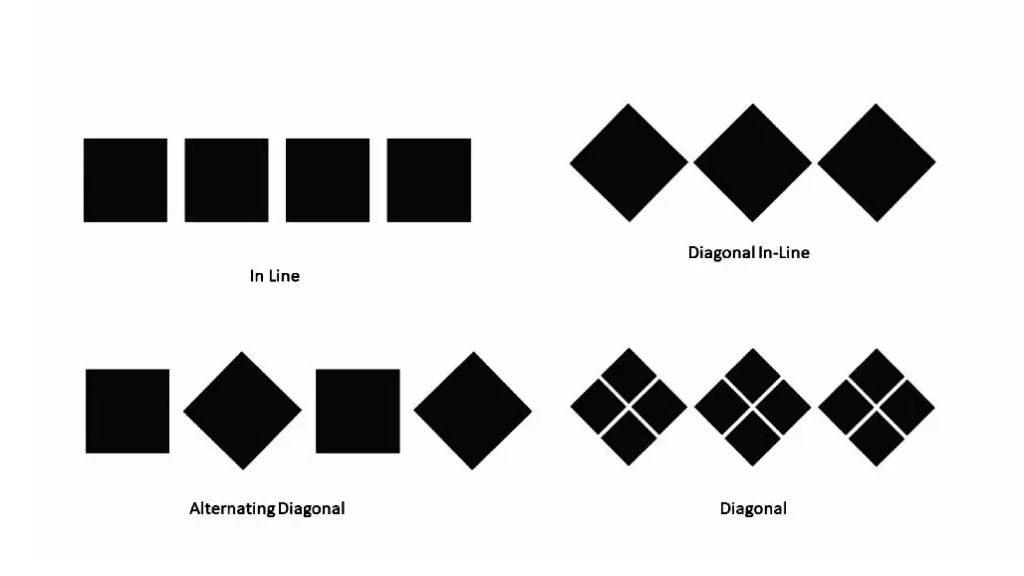
9. In Line Acoustic Panel Layout
Acoustic Panels are placed in a straight line on the wall. This is a simple but effective layout for reducing sound reflections in a specific direction.
10. Diagonal In Line Acoustic Panel Layout
Acoustic Panels are placed in a straight line diagonally across the wall. This can help to control sound reflections from specific angles and create a more balanced acoustic environment.
11. Aternating Diagonal Acoustic Panel Layout
Acoustic Panels are placed diagonally in an alternating pattern. This can help to diffuse sound waves and prevent standing waves from forming.
12. Diagonal Acoustic Panel Layout
Acoustic Panels are placed diagonally on the wall. This can help to control sound reflections from specific angles and create a unique acoustic pattern.
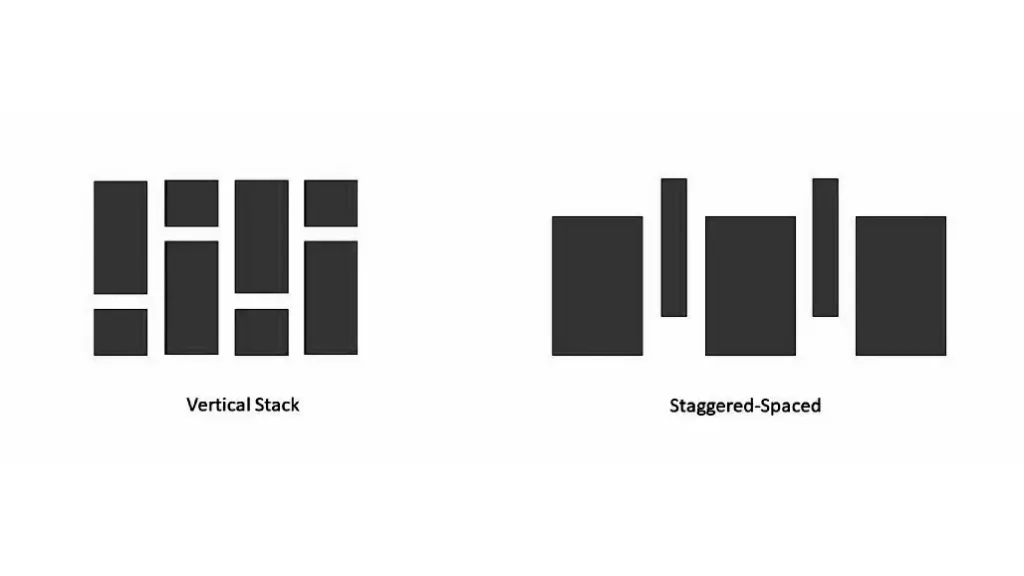
13. Vertical Stack Acoustic Panel Layout
Panels are stacked vertically on top of each other. This layout is often used to absorb sound waves that travel vertically, such as those from ceiling reflections. It’s particularly effective in spaces with high ceilings or where sound reflections are causing problems from above.
14. Staggered-spaced Acoustic Panel Layout
(This is a repetition of a previous layout.) Panels are spaced unevenly on the wall. This can help to diffuse sound waves and prevent standing waves from forming. It’s often used in spaces with complex acoustics or where specific sound reflection patterns need to be controlled.
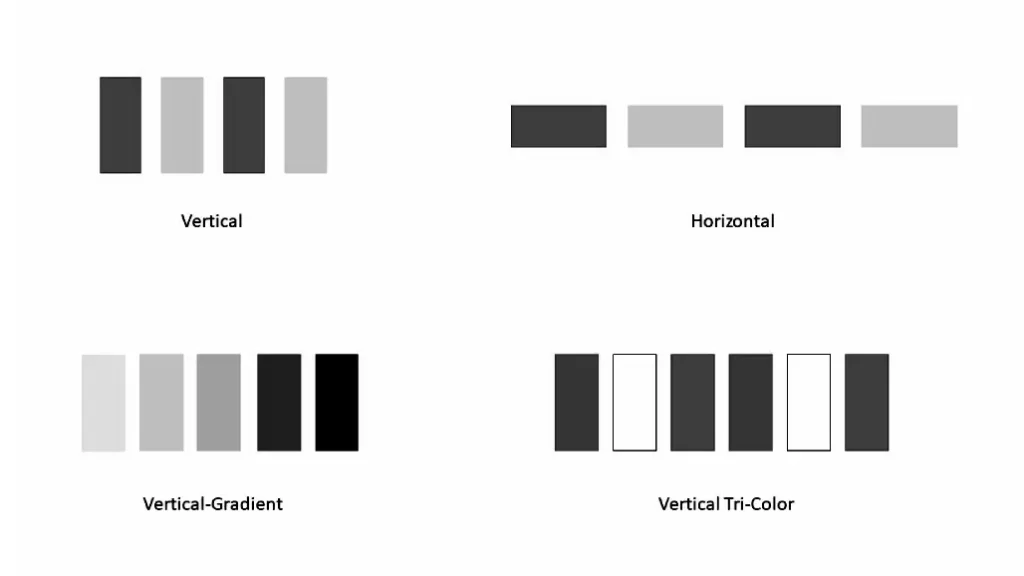
15. Multi-color Acoustic Panel Layout
In this arrangement, acoustic panels of various colors are used to create a visually appealing and functional design. This layout can be used to add a decorative element to a space while also improving acoustics.
The different colors can be arranged in a variety of patterns, such as stripes, checkerboards, or random patterns. Multi-color layouts can be particularly effective in spaces where aesthetics are important, such as home theaters or music studios.
Multi-color acoustic panels can be patterned
- vertical
- horizontal
- vertical gradient
- vertical tri-color
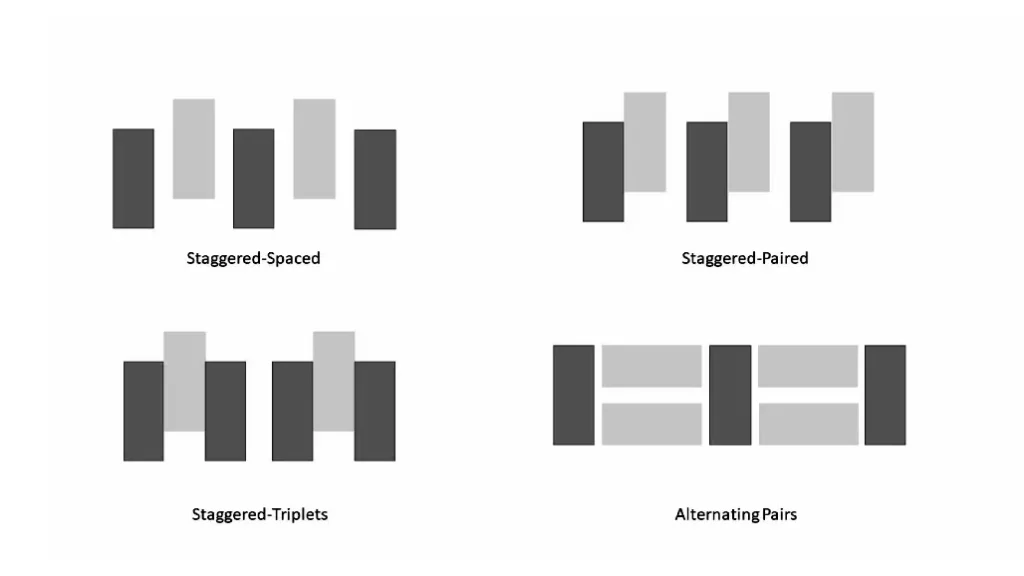
The layout methods are the same as the above 4 acoustic panel layouts (5~7) but with multiple colors, and you can mix any color acoustic panels to complete the full acoustic panel layout design.
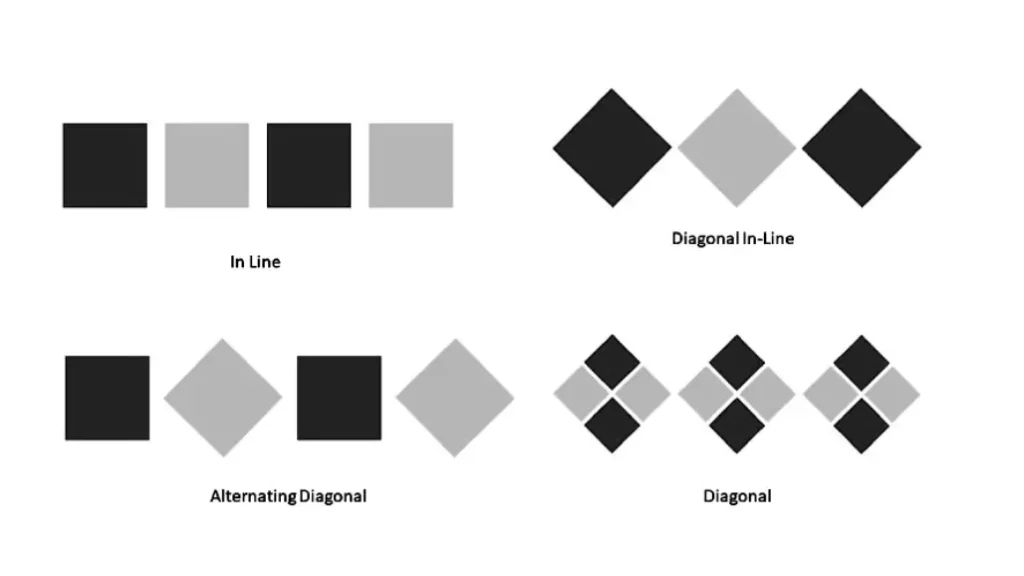
The layout methods are the same as the above 4 acoustic panel layouts (9~12) but with multiple colors, and you can mix any color acoustic panels to complete the full acoustic panel layout design.
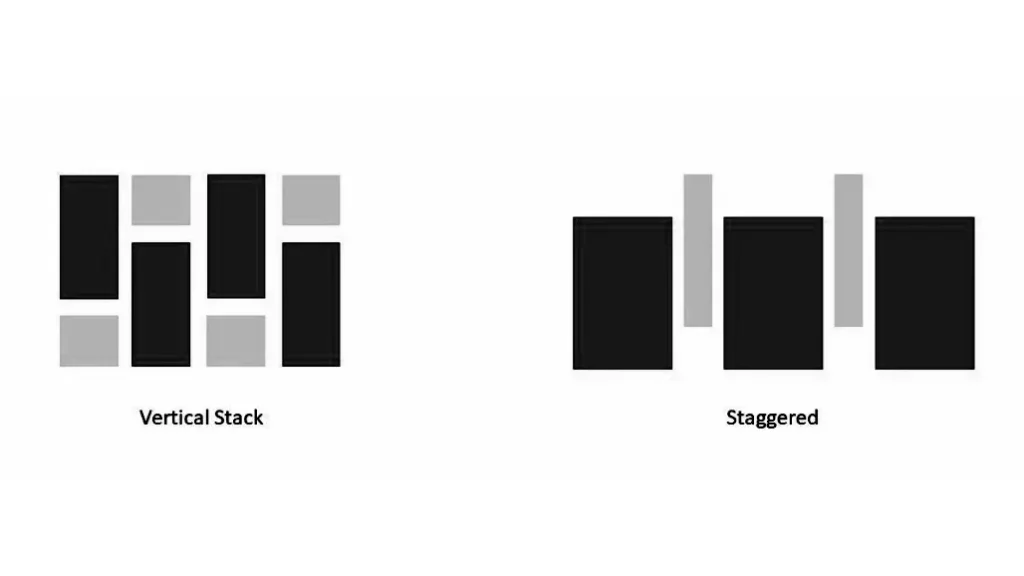
The layout methods are the same as the above 2 acoustic panel layouts (13~14) but with multiple colors, and you can mix any color acoustic panels to complete the full acoustic panel layout design.

Acoustic Panel Cluster Layouts involve grouping multiple panels in a specific arrangement. This can be done in various ways, including:
- Vertical Clusters: Panels are stacked vertically in groups.
- Horizontal Clusters: Panels are arranged horizontally in groups.
- Diagonal Clusters: Panels are arranged diagonally in groups.
- Random Clusters: Panels are grouped together in a random pattern.
Benefits of Cluster Layouts:
- Enhanced absorption: Clusters can provide more effective sound absorption than individual panels.
- Improved diffusion: Clusters can help to diffuse sound waves more evenly.
- Visual interest: Clusters can create visually interesting patterns and designs.
- Customization: Cluster layouts can be customized to suit specific acoustic needs and aesthetic preferences.
When designing acoustic panel cluster layouts, it’s important to consider factors such as the room’s size, shape, and intended use. A professional acoustician can help to determine the best layout for a particular space.
Acoustic Panel Layout Planner

An acoustic panel layout planner is a valuable tool that can help you visualize and design the optimal placement of acoustic panels in your space. These planners often provide interactive features, such as:
- Room dimensions: Input the dimensions of your room to create a virtual representation.
- Acoustic panel placement: Drag and drop panels onto the virtual room to experiment with different layouts.
- Sound reflection analysis: Simulate sound reflections and identify areas where panels would be most beneficial.
- Absorption coefficient data: Input the absorption coefficients of different panel materials to assess their effectiveness.
- Customization options: Choose from various panel shapes, sizes, and colors to match your aesthetic preferences.
Benefits of using an acoustic panel layout planner:
- Visualize different layouts: Experiment with various arrangements without physically moving panels.
- Optimize sound absorption: Identify the most effective panel placement for your specific room and sound goals.
- Avoid trial and error: Save time and effort by planning your layout in advance.
- Create professional-looking designs: Share your layouts with contractors or clients.
Popular acoustic panel layout planner options:
- Online tools: Many websites offer free or premium acoustic panel layout planners.
- Software applications: Specialized software programs can provide advanced features and customization options.
- Mobile apps: Some apps allow you to create layouts on your smartphone or tablet.
When choosing an acoustic panel layout planner, consider:
- Ease of use: The planner should be intuitive and easy to navigate.
- Features: Ensure the planner offers the features you need, such as room dimensions, panel placement, and sound reflection analysis.
- Customization options: Look for a planner that allows you to customize the appearance of your panels and room.
- Compatibility: If you plan to use the planner with other software, ensure it is compatible.
By using an acoustic panel layout planner, you can create a well-designed and effective acoustic environment that meets your specific needs.
Where Should Acoustic Panels Be Placed in a Room
The placement of acoustic panels in a room can significantly impact their effectiveness in reducing noise and improving sound quality. Here are some general guidelines:
Key Considerations:
- Sound Reflection: Identify the primary surfaces where sound reflects. These are often walls, ceilings, and floors.
- Noise Source: Determine the location of the noise source. This will help you target the areas where sound is most problematic.
- Listening Position: Consider where you’ll be listening to sound. Place panels accordingly to optimize sound quality.
General Placement Guidelines:
- Behind the Listening Position: This is a common placement for absorbing sound that reflects off the back wall and ceiling.
- On Side Walls: Placing panels on the side walls can help reduce reflections that cause echoes and coloration in the sound.
- On the Ceiling: Ceiling panels can effectively absorb sound that reflects directly overhead, improving sound clarity and reducing reverberation.
- Around Noise Sources: If you can identify the source of noise, placing panels near it can help absorb sound before it spreads throughout the room.
Specific Scenarios:
- Home Theater: Place panels behind the screen, on the side walls, and on the ceiling to create a more immersive and balanced soundstage.
- Music Studio: Consider placing panels on all surfaces to minimize reflections and achieve a more accurate sound.
- Office: Target areas where noise is most disruptive, such as near windows or open-plan spaces.
- Restaurant: Place panels on the walls and ceiling to reduce noise levels and improve the dining experience.
Additional Tips:
- Experimentation: Try different placements and listen to the results.
- Professional Consultation: If you’re unsure about placement, consider consulting with an acoustic engineer or sound professional.
- Room Size and Shape: The size and shape of the room will influence panel placement. Larger rooms may require more panels.
- Panel Type: The type of panel (absorbent or diffusion) will also affect placement. Absorbent panels are typically used to reduce reflections, while diffusion panels can help distribute sound more evenly.
By following these guidelines and considering the specific needs of your space, you can effectively use acoustic panels to improve sound quality and create a more enjoyable listening experience. Would you like to know more about different types of acoustic panels or their materials?
Conclusion
Acoustic panel layout is a powerful tool for optimizing your room’s acoustics and creating a more enjoyable listening experience. By strategically placing panels to absorb sound and reduce reflections, you can enhance sound clarity, reduce noise, and improve overall comfort.
Ready to elevate your room’s acoustics?
Contact us today to learn more about our premium acoustic panels and get expert advice on the best layout for your space. With our high-quality products and personalized service, we can help you achieve optimal sound absorption and create a truly immersive listening environment.
And don’t hesitate to contact us now to get your custom acoustic panel layout, and our experienced stuff can give you the best acoustic panel solutions to help you create a pleasant room space soundproof.

