Are you tired of echoey rooms and poor sound quality? Acoustic panels can transform your space into a sound haven, but their effectiveness depends largely on their placement.
In this blog, we’ll explore the best locations to install acoustic panels for optimal sound control. Whether you’re aiming to enhance your home theater experience, improve focus in your home office, or create a professional-grade recording studio, this guide will help you maximize the benefits of your acoustic panels.
Let’s get started on creating a quieter, clearer, and more enjoyable space!
The Problem with Audio Issues Before Placing Acoustic Panels
Audio issues can significantly impact the quality of life in both residential and commercial settings. They can lead to frustration, discomfort, and even health problems. Before investing in acoustic panels, it’s crucial to identify the root causes of these issues.
Here are some common problems associated with audio issues:
- Noise pollution: Excessive noise can disrupt sleep, concentration, and overall well-being.
- Communication difficulties: Poor acoustics can make it challenging to understand conversations, especially in noisy environments.
- Hearing damage: Long-term exposure to loud noises can lead to hearing loss.
- Reduced productivity: Noise can hinder focus and productivity, especially in office settings.
- Stress and anxiety: Constant noise can contribute to stress and anxiety.
By understanding the specific problems caused by audio issues, you can make informed decisions about the best solutions to improve your acoustic environment.
Would you like to discuss specific audio issues you’re experiencing or learn more about the benefits of acoustic panels?
Acoustic Panel Placement
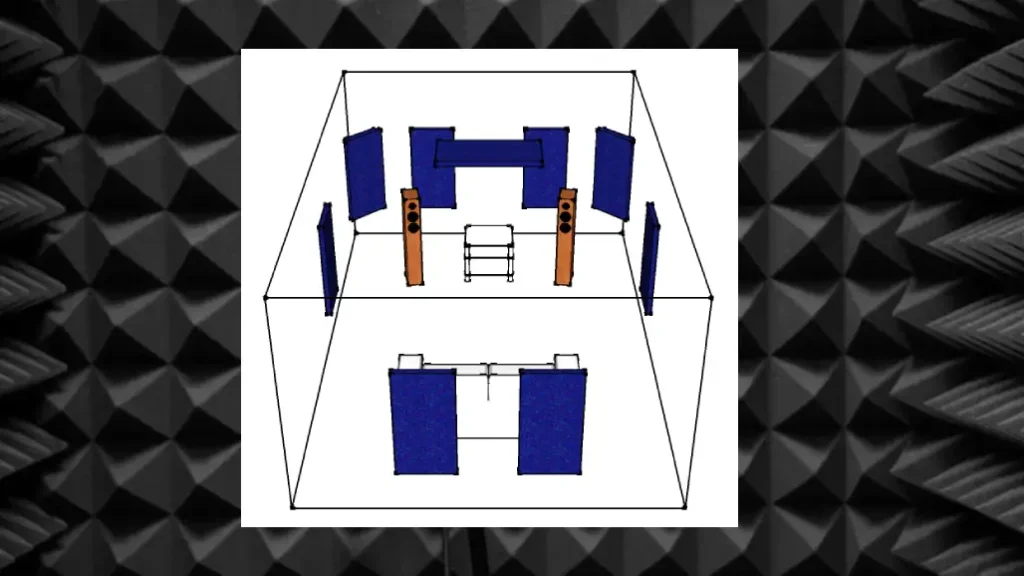
Placing acoustic panels is essential for optimizing their effectiveness.
Here’s a breakdown of key areas to focus on:
Identifying Reflection Points
- Mirror trick: This involves using a mirror to locate where sound reflects off walls and directly back to your listening position.
- Prioritize first reflection points: These are the areas where sound bounces off the walls and directly back to your ears. Treating these points significantly improves sound clarity.
Key Placement Areas
- Side walls: These are often the most problematic due to early reflections. Place panels at ear level and speaker height.
- Rear wall: Can benefit from a combination of acoustic panels and diffusers to balance sound absorption and diffusion.
- Ceiling: Treat the area above your listening position to reduce echo and reverberation.
- Corners: Use bass traps in corners to address low-frequency issues.
- Behind speakers: Placing panels behind your speakers can help reduce reflections and improve soundstage.
Additional Tips
- Experimentation: Don’t hesitate to adjust panel placement to achieve desired results.
- Balance: Strive for a balance between absorption and diffusion.
- Room size and shape: Consider these factors when determining optimal placement.
- Aesthetics: Choose panel materials and colors that complement your room’s decor.
Visual Guide
Remember: The specific placement of acoustic panels will depend on the room’s intended use, its dimensions, and the acoustic challenges you’re trying to address.
Would you like to focus on a specific room type, such as a home theater, recording studio, or home office?
Acoustic Panel Layout

The layout of acoustic panels is crucial for maximizing their effectiveness in absorbing sound. Here are some visual examples and explanations:
1. Uniform Coverage:
- Even distribution: Panels are evenly spaced across the walls and ceiling to create a consistent sound-absorbing surface.
- Example: A home theater with panels covering the entire back wall.
2. Reflection Point Targeting:
- Focused placement: Panels are strategically placed at known reflection points to absorb sound before it bounces back into the room.
- Example: A recording studio with panels positioned at the corners of the room.
3. Bass Trap Placement:
- Corner placement: Bass traps, which specialize in absorbing low-frequency sounds, are typically placed in corners of the room.
- Example: A music studio with bass traps in the corners of the room.
4. Absorption and Diffusion:
- Combination: A mix of absorption and diffusion panels can be used to create a balanced acoustic environment.
- Example: A home theater with a combination of absorption panels on the walls and diffusion panels on the ceiling.
5. Modular Design:
- Flexibility: Modular panels can be easily rearranged to adapt to different room configurations or sound needs.
- Example: A home office with modular acoustic panels that can be rearranged as needed.
Remember that the ideal acoustic panel layout will depend on the specific characteristics of your room, the desired sound quality, and your aesthetic preferences. Experimentation and professional advice can help you achieve the best results.
Acoustic Panel Placement Calculator

Unfortunately, there isn’t a definitive acoustic panel placement calculator that can pinpoint exact locations for your panels.
While several online tools can help estimate the number of panels needed based on room dimensions and desired acoustic goals, determining the precise placement often requires a combination of:
- Room acoustics analysis: This involves measuring the room’s dimensions, identifying reflection points, and assessing existing acoustic conditions.
- Trial and error: Adjusting panel positions to achieve optimal sound quality.
- Expert consultation: Seeking advice from an acoustic consultant for complex spaces.
Available Tools
While not providing exact placement, these tools can offer valuable insights:
Acoustic panel calculators: Estimate the number of panels needed based on room size and desired sound absorption. Examples include:
- GIK Acoustics: https://www.gikacoustics.com/acoustic-panels-calculator/
- My Acoustic Panels: https://www.myacousticpanels.com/pages/design-your-room
- Acoustic: https://www.acoustimac.com/room-calculator
- Audimute: https://www.audimute.com/acoustic-panel-room-calculator
Acoustic software: Advanced software can simulate room acoustics and provide placement recommendations. However, these tools require expertise to use effectively.
Remember:
- General guidelines: Follow general placement principles, such as treating first reflection points, side walls, and corners.
- Experimentation: Adjust panel positions based on your listening experience.
- Professional consultation: Consider consulting an acoustic expert for complex spaces or critical listening environments.
Why Does Placement of Acoustic Panels Matter?
The placement of acoustic panels is crucial for their effectiveness in improving sound quality. Here’s why:
- Sound Reflection: Acoustic panels absorb sound waves. By placing them in areas where sound reflects the most, such as walls, ceilings, and corners, you can reduce unwanted echoes and reverberation.
- Sound Absorption: The effectiveness of acoustic panels depends on their placement in relation to the sound source. Placing them closer to the source will result in more sound absorption.
- Room Acoustics: The overall acoustics of a room are influenced by the placement of acoustic panels. By strategically placing them, you can create a more balanced and pleasant sound environment.
- Visual Appeal: The placement of panels can also impact the visual appearance of a room. Careful placement can enhance the overall aesthetic.
Here are some general guidelines for placing acoustic panels:
- Reflecting Surfaces: Prioritize areas where sound reflects the most, such as walls, ceilings, and corners.
- Sound Source: Place panels near the sound source for maximum absorption.
- Room Size and Shape: Consider the size and shape of the room when determining panel placement.
- Visual Appeal: Ensure the panels complement the overall design of the space.
By following these guidelines, you can optimize the effectiveness of your acoustic panels and create a more enjoyable listening experience.
Acoustic Panel Positioning: Optimizing Sound Absorption

The placement of acoustic panels significantly impacts their effectiveness in absorbing sound. Here are some key considerations for optimal positioning:
1. Identifying Sound Reflection Points:
- Use a mirror: Hold a mirror against the wall and move it around until you see a reflection of the sound source. This point is likely a reflection point.
- Listen for echoes: Pay attention to areas where sound echoes or reverberates. These are often reflection points.
2. Placing Panels at Reflection Points:
- Directly on the wall: Place panels directly over reflection points to absorb the sound before it bounces back into the room.
- Corner placement: For more diffuse sound reflection, consider placing panels in corners.
3. Considering Room Geometry:
- Room size: Larger rooms may require more panels to effectively absorb sound.
- Room shape: Irregular shapes can create complex sound patterns. Experiment with panel placement to achieve optimal results.
4. Panel Coverage:
- Sufficient coverage: Ensure panels cover a significant portion of the reflective surfaces.
- Avoid gaps: Minimize gaps between panels to prevent sound from bypassing them.
5. Height and Angle:
- Height: Place panels at a height that corresponds to the sound source and reflection points.
- Angle: Consider the angle of sound waves and position panels accordingly.
6. Absorption Coefficient:
- Panel material: The material used in acoustic panels determines their absorption coefficient. Choose panels with high absorption coefficients for optimal performance.
7. Room Usage:
- Purpose: The intended use of the room (e.g., music studio, home theater, office) will influence panel placement.
By following these guidelines, you can effectively position acoustic panels to improve sound quality, reduce noise, and create a more comfortable and productive environment.
How to Place Acoustic Panels

Understanding where to place acoustic panels is crucial to maximizing their effectiveness.
Here’s a general guide:
Identify Reflection Points
- Mirror trick: Sit in your listening position and have someone move a mirror along the walls. If you can see the speaker in the mirror, that’s a reflection point.
- Focus on first reflection points: These are the primary areas to treat.
Prioritize Treatment Areas
- Side walls: These are often the most problematic due to early reflections.
- Rear wall: Can benefit from treatment to control sound reflections.
- Ceiling: Can help reduce echo and reverberation.
- Corners: Use bass traps to address low-frequency issues.
Consider Room Usage
- Home theater: Prioritize first reflection points and bass traps.
- Home studio: Treat side walls, rear wall, and ceiling for optimal sound isolation.
- Bedroom: Focus on walls behind the bed and the ceiling for a quieter environment.
- Home office: Treat walls behind your desk and the areas with the most noise.
General Tips
- Start with smaller areas: Begin with treating the most problematic areas and gradually expand.
- Experiment: Don’t be afraid to adjust panel placement to achieve desired results.
- Balance: Aim for a balance between absorption and diffusion.
- Consider aesthetics: Choose panel materials and colors that complement your room’s decor.
Visual Guide
Remember: The optimal placement of acoustic panels depends on the specific room, its dimensions, and the desired acoustic outcome.
Would you like to focus on a specific room or have any other questions about panel placement?
How to Position Acoustic Panels

Proper placement of acoustic panels is crucial for optimizing sound quality. Here’s a general guide:
Identify Problem Areas
- Reflection Points: These are areas where sound bounces off walls and creates echoes. Use a mirror to find these points by standing at your listening position and moving the mirror along the walls until you see the speaker reflected in it.
- Bass Traps: Corners are notorious for bass buildup. Bass traps can help absorb these low frequencies.
Panel Placement
- First Reflection Points: Place panels on the walls where sound directly reflects from your speakers to your listening position. This helps to reduce echo and improve clarity.
- Behind Speakers: Panels behind speakers can help to reduce reflections from the wall and improve soundstage.
- Ceiling: If you have high ceilings, consider placing panels on the ceiling to absorb sound and reduce reverberation.
- Corners: Use bass traps in corners to control low-frequency issues.
Additional Tips
- Experiment: Don’t be afraid to experiment with different panel placements to find the optimal setup for your room.
- Coverage: The amount of panel coverage needed depends on the room size, shape, and desired acoustic environment.
- Panel Type: Different panel materials and thicknesses absorb different frequencies, so choose the right panels for your needs.
- Room Size and Shape: The shape and size of your room will influence panel placement.
Visual Guide:
Remember: This is a general guide. For optimal results, consider consulting with an acoustic professional or using acoustic measurement tools.
Where to Place Acoustic Panels

Where should acoustic panels be placed in a room?
The strategic placement of acoustic panels is crucial for optimizing their effectiveness. Here are some key areas to consider:
First Reflection Points
- Identify: These are the points on the walls where sound directly reflects from your speakers to your listening position.
- Importance: Treating these points significantly improves sound clarity and reduces echo.
- Placement: Place acoustic panels on the walls at these reflection points.
Room Corners
- Bass Traps: Corner placement is ideal for bass traps, which help to control low-frequency sound.
- Benefits: Reduces unwanted resonances and improves overall sound balance.
Ceiling
- Echo Reduction: Panels on the ceiling help reduce echo and reverberation.
- Considerations: The height of your ceiling will influence the optimal placement.
Behind Speakers
- Reflection Control: Placing panels behind your speakers can help reduce reflections and improve soundstage.
Opposite the Listening Position
- Sound Absorption: Panels on the wall opposite your listening position can absorb sound and reduce echoes.
General Tips:
- Even Distribution: For optimal results, distribute panels evenly throughout the room.
- Experimentation: Don’t hesitate to experiment with different panel placements to find the best configuration.
- Room Size and Shape: Consider the size and shape of your room when determining panel placement.
Remember: The specific placement of acoustic panels will depend on the room’s intended use, the type of sound you want to improve, and the size and shape of the room.
Would you like to focus on a specific room type, such as a home theater, recording studio, or office?
Where to Place Acoustic Panels in a Bedroom?
While bedrooms are primarily for sleep, they can also be used for relaxation, reading, or listening to music. Acoustic panels can significantly improve the sound environment in your bedroom. Here’s where to place them:
Focus on Sound Absorption:
- Walls behind your bed: This can help reduce noise from outside or from other rooms.
- Ceiling: Panels on the ceiling can help to reduce echo and reverberation, creating a calmer atmosphere.
If you have a home office or entertainment area in your bedroom:
- First reflection points: Identify the points on the walls where sound directly reflects from your speakers to your ears. Place panels here to improve sound clarity.
- Corners: Use bass traps in corners to control low-frequency sounds.
Additional Tips:
- Balance: Aim for an even distribution of panels for optimal results.
- Experiment: Try different placements to find the best configuration for your room.
- Aesthetics: Choose panels that complement your bedroom decor.
Remember: The size of your bedroom and the specific issues you want to address will influence the best placement for your acoustic panels.
Where to Place Acoustic Panels in a Home Theater
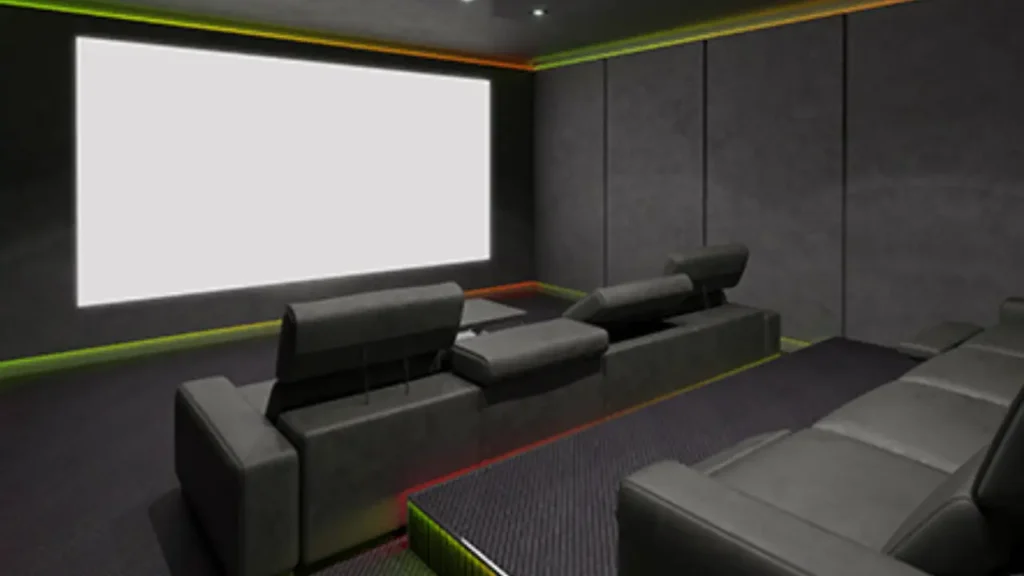
Optimizing your home theater’s acoustics requires careful placement of acoustic panels. Here are the key areas to focus on:
First Reflection Points
- Identify: These are the points on the walls where sound directly reflects from your speakers to your listening position.
- Importance: Treating these points is crucial for reducing echoes and improving sound clarity.
- Placement: Place acoustic panels on these walls to absorb sound.
Side Walls
- Priority: Side walls are often the most reflective surfaces.
- Coverage: Cover as much of the side walls as possible with acoustic panels.
- Balance: Ensure even coverage for optimal results.
Front Wall
- Behind Speakers: Placing panels behind your speakers can help reduce reflections and improve soundstage.
- Avoid Over-Treatment: Be cautious not to overly dampen the front wall, as it can affect sound quality.
Rear Wall
- Diffusion: Consider using diffusion panels on the rear wall to scatter sound evenly.
- Absorption: Acoustic panels can also be used on the rear wall for additional sound control.
Ceiling
- Echo Reduction: Panels on the ceiling can help reduce echo and improve overall sound clarity.
- Coverage: Focus on areas directly above the listening position.
Bass Traps
- Corners: Place bass traps in the corners of your room to control low-frequency sound.
- Floor-to-Ceiling: For maximum effectiveness, extend bass traps from the floor to the ceiling.
Remember:
- Experimentation: Don’t hesitate to experiment with different panel placements to achieve the best sound.
- Room Acoustics: The size and shape of your room will influence the optimal placement.
- Balance: Strive for a balance between absorption and diffusion for optimal results.
By following these guidelines and considering your specific room, you can significantly enhance your home theater experience.
Where to Place Acoustic Panels in a Home Office

A quiet and focused workspace is essential for productivity. Acoustic panels can significantly improve your home office environment. Here’s where to place them:
Key Areas for Acoustic Panels in a Home Office:
- Behind your desk: This is where the majority of sound originates. Placing panels here can help absorb sound and reduce echoes.
- Walls opposite your desk: This wall often reflects sound back towards you, creating distractions. Acoustic panels can help to mitigate this.
- Ceiling: If you experience a lot of noise from above, such as footsteps or HVAC systems, panels on the ceiling can help reduce sound transmission.
- Doors and windows: To minimize external noise, consider placing panels near doors and windows.
Additional Tips:
- Focus on sound absorption: For most home offices, sound absorption is more important than diffusion.
- Consider your office layout: The shape and size of your office will influence the best placement of panels.
- Experiment: Don’t be afraid to try different panel arrangements to find the optimal configuration.
By strategically placing acoustic panels in your home office, you can create a quieter, more focused workspace.
Where to Place Acoustic Panels on the Ceiling

The ceiling is often overlooked when it comes to acoustic treatment, but it can significantly impact sound quality. Here’s where to focus your attention:
1. Center of the Room:
- This is a great starting point, especially for larger rooms.
- A “cloud” of acoustic panels in the center can help to absorb sound evenly and reduce echo.
2. Above the Listening Area:
- For home theaters or listening rooms, placing panels directly above your listening position can help to reduce sound reflections that can affect clarity and imaging.
3. Around Light Fixtures:
- If you have recessed lighting, placing panels around these fixtures can help to absorb sound that might be reflected by the light fixture itself.
Additional Tips:
- Coverage: While covering the entire ceiling is ideal, it might not be practical or necessary. Focus on the areas where you experience the most sound issues.
- Panel Size: Larger panels can be more effective in covering a wider area, but multiple smaller panels can also be used.
- Experimentation: Don’t be afraid to experiment with different panel placements to find the best results for your space.
Remember: The specific placement will depend on your room’s size, shape, and the acoustic challenges you’re trying to address.
Where to Place Acoustic Panels in a Home Studio

Optimizing your home studio’s acoustics is crucial for achieving professional-quality recordings. Proper placement of acoustic panels is key. Here’s a breakdown:
Key Areas for Acoustic Treatment:
- First Reflection Points: These are the areas where sound bounces off the walls and directly back to your ears. Treating these points significantly improves sound clarity.
- Side Walls: Cover as much of the side walls as possible with acoustic panels to control lateral reflections.
- Rear Wall: Consider using a combination of acoustic panels and diffusers on the rear wall to balance sound absorption and diffusion.
- Ceiling: Treat the ceiling to reduce echo and reverberation. Focus on the area above your listening position.
- Corners: Use bass traps in the corners to control low-frequency issues.
Additional Tips:
- Balance: Strive for a balance between absorption and diffusion.
- Experimentation: Don’t be afraid to experiment with different panel placements to achieve the desired sound.
- Room Size and Shape: The dimensions of your studio will influence the optimal placement of panels.
- Listening Position: Consider the placement of your listening position and how it relates to the speaker placement.
Remember, acoustic treatment is a process, and you may need to make adjustments as you fine-tune your studio.
Conclusion
Properly positioning acoustic panels can dramatically enhance your listening experience. By targeting reflection points, treating corners, and experimenting with different arrangements, you can effectively reduce echoes, improve sound clarity, and create a more immersive audio environment.
Ready to transform your space? Contact us today to request acoustic panel samples and get expert advice on finding the perfect solution for your needs.